Welcome to cat-inspector
cat-inspector is a no-code QA platform built around a simple idea: your backend team explicitly exposes a safe, documented set of functions and HTTP-style units. QA and other stakeholders drive those units from a catalog—forms built from real parameter metadata—not from handwritten test code in your app’s language.
This documentation site helps you understand the product, see the benefits, and integrate the host SDK or operate the platform. A headline win is visibility: QA works against a named catalog and structured runs, not a black box where failures are impossible to tie back to a specific function. If you are new here, read this page once, then open Platform for how the whole system fits together, or SDK when you are ready to wire TypeScript into your server.
What is this, in one paragraph?
Traditionally, deep checks against server logic mean either developers maintain suites in TypeScript/JavaScript, or QA depends on slow back-and-forth and shallow manual checks. cat-inspector changes the split of work: developers register or annotate what is allowed to be called and how arguments are validated; the wire protocol and QA tools handle discovery, invocation, and structured results. The host runtime (the SDK) lives inside your Node.js app. The QA web experience (and optional automation) talks to that runtime over a versioned channel (for example WebSocket or Socket.IO).
You are not replacing Express or your database layer. You are adding a controlled, allowlisted surface that QA tools can trust.
What can you do with it?
With cat-inspector you can:
- Publish a live catalog of callable units (
fnKey, display metadata, parameters, return hints, optional JSON Schemas) so tools and humans know what exists and how to call it. - Invoke registered handlers over a defined RPC pipeline: validate inputs, run the function, serialize success or typed errors, and emit inspector events so UIs can visualize runs (what happened, in what order—not only a binary pass/fail).
- Connect a QA web app (or your own client) over embedded WebSocket or Socket.IO so testers use dynamic forms instead of writing
describe/itblocks in your repo. - Enrich metadata from TypeScript sources using an AST pass so the catalog stays closer to real types when you want it.
- Layer policies (pre-invoke hooks, audit, rate limits) and file upload flows where the protocol supports them.
What you do not get out of the box is “click every pixel in the browser” end-to-end testing—that stays with tools like Playwright. What you do get is fast, repeatable, metadata-driven checks against server logic you choose to expose.
What the platform looks like
Below is a real screenshot-style view of the Gloocan QA pipeline in the web app: this is how teams run scenarios, execute registered functions as steps, and read structured results in one place—not from scattered scripts or mystery API calls.
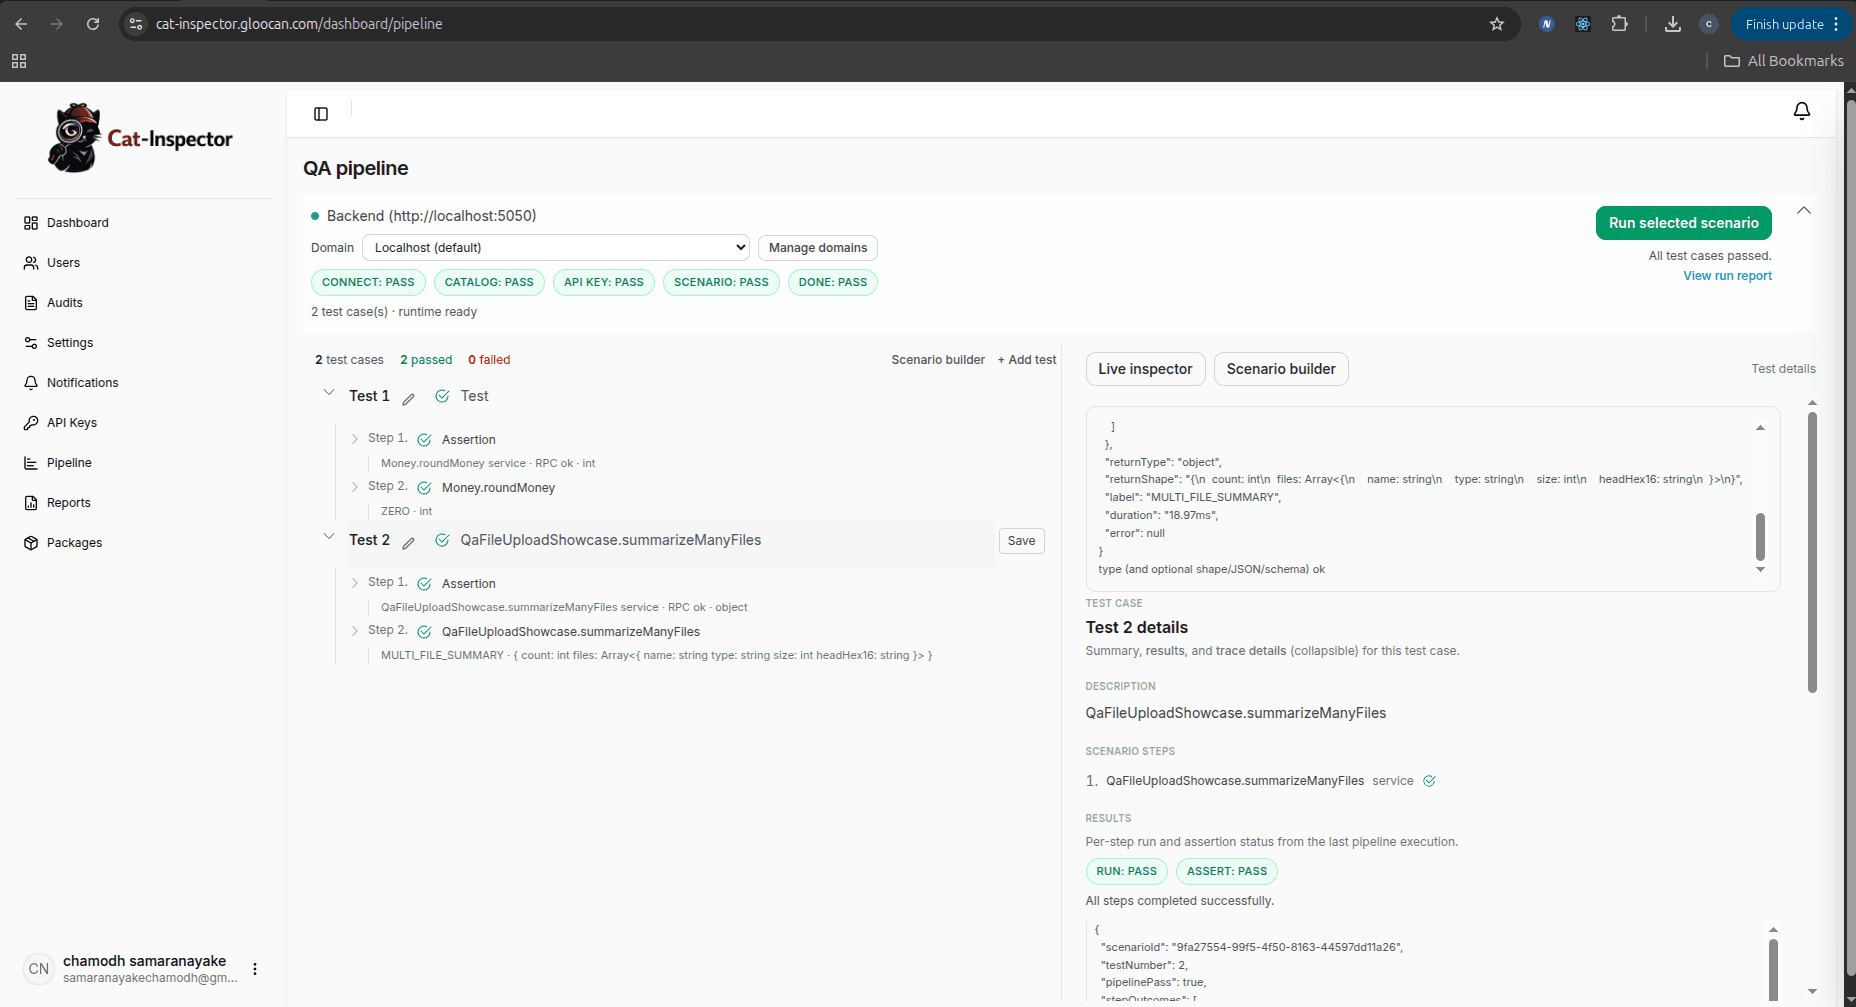
What you are seeing (and what you can do here):
- Pipeline status across the top — High-level stages such as connect to the host, load the catalog, API key, scenario, and done show as pass/fail badges so you know where the run stalled before you open any log file.
- Scenarios and test cases in the center — Each scenario lists test cases (for example “Sample Test Function 01 / 02”) with expandable steps (assertions and RPC calls such as a
Money.roundMoneyservice). That is how QA runs tests and invokes functions that your developers exposed through the SDK: pick a scenario, then use Run selected scenario (or equivalent) to execute the full flow against the connected backend. - Live Inspector on the right — When you select a test, the inspector shows granular outcomes: run vs assert, JSON payloads,
fnKey,stepOutcomes, and per-step status. This is the full visualization benefit in practice: you see which function ran, whether the RPC succeeded, and whether assertions passed, instead of a single opaque failure.
Your exact labels and layout may evolve by product version, but the idea stays the same: one UI to connect, browse the catalog, build or pick scenarios, run them, and inspect structured results tied to registered units. For how that connects to the host SDK and wire protocol, continue with Platform and SDK.
Why use it? Benefits and advantages
| Benefit | What it means for your team |
|---|---|
| Clear separation of roles | Backend owns what is exposed and how it is validated. QA owns cases and expectations in the UI, not merges into your test suite for every scenario. |
| Safer than ad-hoc “test hooks” | Only registered units run. There is no “invoke anything by name from the wire” foot-gun if you follow allowlisting and auth practices. |
| One source of truth for parameters | The same metadata that documents the RPC surface can drive forms and validation, which cuts mismatch between docs, UI, and code. |
| Versioned protocol | Clients and hosts agree on compatibility (PROTOCOL_VERSION and related docs). Upgrades are explicit instead of silent breakage. |
| Faster feedback on logic | Call real handlers in real process context (with the right guardrails), often faster than stitching UI-only scripts for every branch. |
| Easier onboarding for QA | New testers do not need to clone the repo, install toolchains, or read your internal module graph—they need access to the QA app and permission to run cases. |
| No black box for exposed logic | Every automated check hits a registered unit you chose to publish (fnKey + metadata). Runs return structured RPC results (success, typed errors, validation detail)—not “something failed” with no link to which function or which step broke. |
| Visualization and traceability | The QA experience is built around the catalog, inputs, outcomes, and inspector-style events (broadcasts over the transport) so you can see what ran, how it was classified (return labels, API paths, errors), and where to look first when a case fails—without spelunking the whole codebase. |
The magnitude of benefit depends on how often you change business rules, how large your QA group is, and how much friction you have today between “developer-only” tests and “QA-visible” behavior. Teams that already struggle with catalog drift, duplicate test data, or “only devs can run this script” tend to see the largest win.
Best advantage: see where it broke, not just that it broke
Many teams live with a black-box backend from QA’s point of view: only engineers can read traces, only engineers know which internal function handled a route, and a red check in a UI rarely answers “which business rule failed, and under which entry point?” in a way QA can act on.
cat-inspector pushes in the opposite direction for the surface you deliberately expose:
- Named units — The catalog lists exactly what is callable. A failing run is always tied to a specific
fnKey(and the test case that invoked it), so you are not guessing which anonymous path in the server handled the request. - Structured pipeline outcomes — Validation failures, invoke errors, and return serialization are expressed through the RPC pipeline and related types (see the SDK RPC docs and error codes). That gives a clear idea of the failure class before anyone opens an IDE.
- Full visualization in the QA layer — The wire protocol supports inspector events and fan-out (see Inspector events and Jobs & broadcasts) so a connected QA web app can show live progress, responses, and state changes relevant to the run—not only a final pass/fail bit. Visualization here means end-to-end clarity in the product UI: catalog → form → run → timeline of structured signals → assertion result.
- Shorter path from symptom to code — Because the unit is registered and documented in the same system QA uses, handoff to developers is faster: “
OrdersService.placeOrderfailed validation on field X under case #12” beats “the checkout API returned 500 again.”
Deep stack-trace debugging still lives with developers and logs. The advantage for the whole team is that QA and product are no longer blocked behind an opaque wall for every question about what ran and why it failed on the allowlisted surface you chose to show them.
How documentation is organized
This site splits content into two areas. Both are worth skimming; implementation detail today is mainly under SDK, and Platform explains the bigger picture (who uses what, how pieces connect).
Platform
Read this first if you want the product story: host app, SDK runtime, wire protocol, QA web app, and optional pipeline/orchestration. It answers “who does what?” and “how does data flow?” without diving into every API symbol.
SDK
Read this when you integrate the npm package @gloocan/cat-inspector: installation, bootstrap, @Cat and other registration styles, RPC pipeline, transports, protocol messages, validation, uploads, and the API reference.
Important for newcomers: the documented and supported host SDK in this repo is TypeScript / Node.js (sdk/ts). Other language runtimes may appear in the future; until then, treat “SDK” here as TypeScript-first—installation, decorators, and AST tooling all assume a TS host.
A simple mental model
Where to go next
- Platform overview — full picture: roles, components, and how the QA loop connects to your server.
- SDK overview — package pillars, conceptual flow, and links into Getting started (installation, attachCatRPC) and Registration.
- Getting started → Installation — peer dependencies and TypeScript settings when using decorators.
- Getting started → Quick start — minimal copy-paste
attachCatRPCexample. - Getting started → attachCatRPC — Socket.IO host wiring: catalog,
secretApiKey, nested catalog-build options, uploads, and production auth.
If you only remember one thing: cat-inspector is a platform for safe, catalog-driven QA against your Node.js server—with a TypeScript SDK as the integration point today. The sections Platform and SDK are your map for learning it end to end.